How to Make Old Things Look New at Home: DIY Repair and Restoration Guide for Indian Homes 2026
Table of Content
ToggleDIY home repair restoration guide for Indian homes: this article teaches you practical techniques to fix furniture, clothes, appliances and electronics.
DIY repair tips in this guide are based on contractor advice and home improvement communities in India. For structural or electrical work, always consult a licensed professional.
All repair and restoration tips in this guide are sourced from experienced Indian handymen, home improvement practitioners, and real homeowner feedback across Mumbai, Pune, and Delhi households.
The year 2026 marks a turning point for Indian households. DIY home repair restoration is the new mantra: instead of discarding old furniture, appliances, and clothes, more families are embracing the repair and restoration movement. According to The Spruce’s furniture repair guide, simple home repairs extend item life by 5 to 10 years on average. It makes sense: repair costs less than buying new, saves money for other priorities, and reduces waste. Your grandmother’s wooden almirah, that old mixer grinder that still works, and your favourite jeans with a small tear deserve a second life.
This complete DIY home repair restoration guide therefore teaches you practical techniques for every corner of your home. You will learn how to repair and restore old things at home in India using basic tools and affordable materials. Most repairs take less than an hour and cost under 500 rupees. by the end of this guide, you will have the confidence to fix, restore, and transform old items instead of throwing them away.
Quick Answer
This guide walks through practical DIY home repair and restoration techniques for common household fixes in India, helping you handle minor jobs yourself before calling a professional. It covers the tools, steps, and safety basics for everyday repairs.
Key Takeaways
- Should I repair something instead of replacing it: In general, repair is almost always the better choice financially, particularly if the repair cost is less than 50% of replacement cost.
- DIY repair safe or should I always hire a professional: Simple DIY home repair restoration tasks like fixing scratched furniture, patching clothes, and clearing mineral deposits are completely safe and require only basic skills.
- Is visible mending and why is it becoming popular in India: Visible mending means celebrating repairs by making them obvious rather than hiding them.
- Can I prevent common repairs from being needed in the first place: Prevention is much cheaper than repair.
- I repair everything myself or are some repairs too complicated: Most DIY home repair restoration projects are easier than you think.
- Do I buy repair materials and tools in India: Local hardware stores carry most tools and materials.
DIY Home Repair Restoration: Furniture Guide
How to Fix Scratched Furniture: DIY Home Repair Guide
Wooden furniture shows scratches easily, yet most are fixable with simple DIY home repair restoration methods without professional help. the method depends on scratch depth.
For light scratches: Mix equal parts white vinegar and olive oil. Apply with a soft cloth, rubbing along the wood grain. this fills minor scratches and restores shine. The vinegar cuts through dust while the oil nourishes the wood. For deeper scratches: Use a wood filler that matches your furniture colour. Available at hardware stores for 100–200 rupees, wood filler works like putty. Apply with a small brush, let it dry for 30 minutes, then sand smooth with fine-grit sandpaper (220 or higher). Once smooth, apply the vinegar-oil mixture to blend the repaired area with the rest of the furniture. For very deep gouges: Mix wood dust from sanding your furniture with wood glue to create a paste that matches perfectly. Fill the gouge, let it cure for 4 hours, sand, and finish with stain if needed.
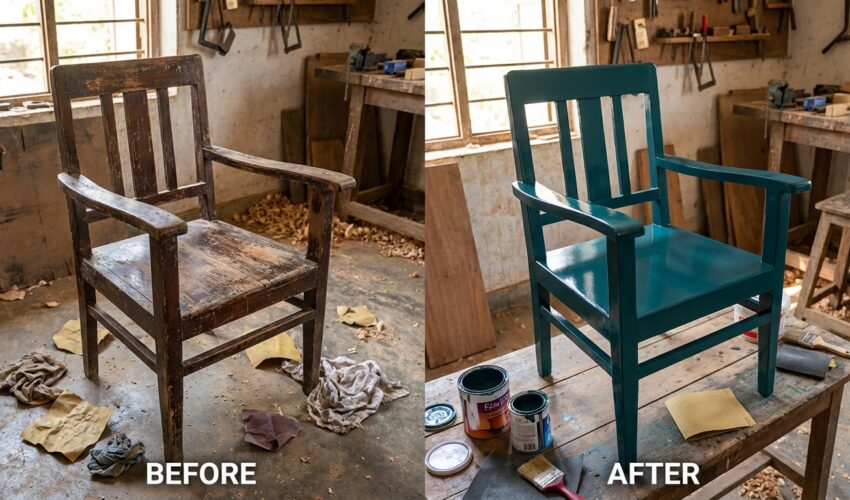
Repainting Old Chairs and Tables
Old painted furniture that looks worn or outdated gains new life with a fresh coat of paint. This works especially well for chairs, side tables, and painted wooden storage boxes.
Preparation is key: First, clean the surface with a damp cloth and let dry completely. If the old paint is glossy, sand lightly with 120-grit sandpaper to help new paint stick. This takes 15 minutes for a small table. Wipe away dust with a tack cloth or damp rag. Choose the right paint: For furniture, use enamel paint or acrylic enamel rather than regular wall paint. enamel lasts longer and handles wear better. A 500ml tin costs 300–500 rupees and covers one chair or side table with 2–3 coats. Paint technique: Apply thin coats rather than one thick coat. Two coats of quality enamel look better and last longer than three thick coats. let each coat dry fully (usually 4–6 hours) before applying the next. Use a roller for flat surfaces and a brush for details and edges.
Fixing Loose Joints: DIY Home Repair Solutions
Wobbly chairs and tables are certainly annoying but easily fixed. they wobble because joints have loosened over years of use.
The wood glue method: If the joint has separated slightly, inject wood glue into the gap using a small brush or applicator. Clamp the joint tightly (use a strap, rope, or even a bedsheet wrapped tightly) for 24 hours while the glue sets. This costs under 100 rupees and works for most loose joints.
Tightening screws: Check if legs are attached with screws. Loose screws are the most common cause of wobble. Tighten them with the correct screwdriver. If the screw keeps loosening, remove it, wrap the threads with Teflon tape or a thin layer of wood filler, and reinstall. This prevents the screw from backing out. For stripped holes: If a screw spins without tightening, the hole is stripped. Remove the screw, insert wooden dowels or toothpicks coated with glue into the hole to fill it, let dry, then drill a new pilot hole and reinstall the screw.
Restoring Old Wooden Almirah: DIY Home Restoration Tips
The wooden almirah is a centrepiece of Indian homes. Old ones develop sticky doors, musty smells, and faded finish, but they rarely need replacement.
Unsticking sticky doors: If doors stick or bind, they usually need lubrication or minor adjustment. Simply apply silicone spray or light machine oil to the hinges and slides. Move the door back and forth several times to distribute the lubricant. This takes five minutes and costs nothing if you have oil at home.
Removing musty smells: Leave the doors open for 24 hours in sunlight and fresh air. place activated charcoal, crumpled newspaper, or coffee grounds inside overnight to absorb odours. Avoid mothballs if possible, as their smell lingers. If the smell persists, however, wipe the interior with a cloth slightly dampened with vinegar and let dry.
Refreshing the finish: Old almirahs look dull because the varnish has worn away. a coat of clear wood varnish or furniture polish restores shine without changing colour. Apply with a brush, let dry 4 hours between coats, and apply 2–3 coats. A 500ml tin costs 400–600 rupees. Replacing damaged shelves: If wooden shelves are warped or water-damaged, they can be replaced. Measure the width, depth, and thickness of the old shelf. Most hardware stores can cut new plywood shelves to size for 300–500 rupees. Sand the edges smooth, apply varnish if desired, and slide into place.
Clothing and Fabric: DIY Home Repair Restoration
Patching Torn Clothes: DIY Home Repair with Visible Mending
The visible mending trend celebrates repairs instead of hiding them. a well-placed patch is more stylish than throwing away a favourite shirt.
Fabric patch method: Choose a contrasting or complementary fabric for the patch. Cut a square or rectangle slightly larger than the tear (at least 2cm beyond the damage on all sides). Pin it over the tear, then sew around all edges using a bold thread colour. The stitch line becomes decorative. Use a running stitch or zigzag stitch. For small tears in seams: Turn the garment inside out. Use a needle and thread matching the garment colour. Next, sew along the tear using a ladder stitch or backstitch, pulling stitches tight to close the tear. This repair is nearly invisible from the outside. Reinforcing stress areas: Patches are useful before a tear happens. If you notice thin areas in pockets, cuffs, or seams, sew a small patch now to prevent future rips. This extends the life of clothes significantly.
Removing Stains: DIY Home Restoration for Clothes
Stains do not mean the end of a garment. knowing what type of stain you have determines the best removal method.
Oil and grease stains: Sprinkle baking soda or talcum powder on the stain immediately to absorb oil. Let sit for 30 minutes, brush away the powder, then apply a dab of dish soap directly to the stain. Rub gently and rinse with cool water. Repeat if necessary before washing.
Coffee and tea stains: Soak the stained area in a mixture of one part vinegar and two parts water for 30 minutes. For stubborn stains, add a teaspoon of baking soda to the mixture. Rinse thoroughly and wash as normal. Wine and juice stains: Blot (do not rub) the stain immediately. Pour salt on the wet stain to absorb the liquid. Once dry, brush away the salt. Rinse with cold water. For set-in stains, soak in a mixture of one part hydrogen peroxide and two parts water for 1–2 hours, then wash. Ink stains: Soak the garment in milk for several hours. The lactic acid breaks down ink. use rubbing alcohol on a cotton ball to dab the stain, then rinse and wash.
Dyeing Faded Clothes
Clothes inevitably fade with washing and sun exposure. Instead of discarding them, dye them a deeper shade or a completely different colour.
Choose the right dye: Fibre-reactive dyes like Procion dyes work best for cotton and linen. In contrast, acid dyes work for wool and silk. Both are readily available online or at fabric shops for 200–400 rupees per packet. these dyes produce vibrant, long-lasting colour. Basic dyeing process: Wet the garment thoroughly, then place it in a large pot or bucket filled with dye solution and water (follow packet instructions for ratios). Stir occasionally for 30–45 minutes to ensure even colour. The longer you leave it, the deeper the colour. Rinse in cool water until the water runs clear, then wash with mild soap and dry. Safety note: Wear gloves and avoid touching your face while dyeing. Work in a well-ventilated area or outside. Some dyes require heating (bring the water to a simmer but not boiling), so read instructions carefully.
Altering Old Sarees into Cushion Covers and Bags
Old sarees with small tears, a loose pallu, or simply too many to wear have new purpose. transform them into home decor or functional items. Cushion covers: A saree easily makes two cushion covers (60cm x 60cm). First, cut the saree to size, fold in half, and sew three sides closed. Turn right-side out, insert a cushion, and hand-stitch the opening closed. The pallu (decorative end) becomes a striking feature on the cover.
Tote bags: Cut a 40cm x 60cm rectangle from the saree. Fold it in half lengthwise and sew the long side and one short side. Turn right-side out. Fold the top edges inward and sew closed, leaving space for handles. Sew sturdy rope or fabric strips as handles. You have a strong shopping bag. Wall hangings: Frame sections of beautiful sarees as wall art. Mount on wooden frames or stretch over canvas boards using staples on the back. This celebrates the saree’s design and extends its life.
Kitchen Appliances: DIY Home Repair Restoration Guide
Cleaning Burnt Vessels and Pans
Burnt food sticking to the bottom of pans looks permanent but is almost always removable with the right method. Baking soda method: Cover the burnt area with baking soda (add a little water to make a paste if needed). Let it sit for 15 minutes, then scrub with a soft brush or sponge. Baking soda is mildly abrasive and cuts through burnt-on food without scratching stainless steel or non-stick surfaces.
Boiling water and vinegar: Fill the pan halfway with water, add one cup of white vinegar, and bring to a boil. Simmer for 10 minutes. The heat and acid loosen burnt deposits. Drain and scrub with baking soda for a perfect pan. For stainless steel pans: Make a paste of cream of tartar and lemon juice. Apply to burnt areas and scrub vigorously. This removes burnt food and restores shine to stainless steel without using harsh chemicals.
Restoring an Old Mixer Grinder: DIY Home Repair
Mixer grinders slow down or stop grinding properly due to dull blades, accumulated residue, or motor issues. Before replacing it, try these fixes.
Sharpening blades: Remove the blade assembly. Soak it in warm water with a few drops of dish soap for 30 minutes to loosen stuck residue effectively. Dry thoroughly, then sharpen the blades using a sharpening steel or honing stone, moving in one direction along each blade edge. Worn blades are the top reason a grinder underperforms.
Cleaning the motor shaft: Unplug the grinder. The motor shaft where the blade assembly attaches often has food residue that prevents the blades from spinning freely. Clean it with a dry cloth and a small brush. Never use water on the motor. Checking the coupling: The rubber coupling that connects the motor to the blade shaft sometimes cracks or loosens. If it is damaged, remove the screw holding it and replace it (costs 100–200 rupees). This small part is often the culprit when grinding performance drops. Replacing carbon brushes: If the motor makes a grinding noise or sparks, the carbon brushes (small parts that conduct electricity to the motor) are wearing out. Replacement brushes cost 200–400 rupees and you can install them yourself by opening the motor housing and sliding the old ones out.
Fixing Leaky Taps Yourself
a dripping tap wastes water and money. Most leaks come from worn washers, a five-minute fix.
Replacing the washer: Turn off the water supply at the mains. Open the tap to release any remaining water pressure. Unscrew the packing nut (usually a hexagonal nut near the base of the tap handle) using a wrench. This reveals the stem inside. Unscrew the stem and remove the small washer at the bottom. Replace it with a new washer of the same size (available for 20–50 rupees at any hardware store). Reassemble and test. Most leaks stop immediately.
Cleaning the valve seat: If a new washer does not stop the drip, the valve seat (the surface the washer presses against) may be eroded or have mineral deposits. Turn off the water supply. After removing the stem, take fine-grit sandpaper (220 or finer) and gently smooth the valve seat. Wipe away dust, install the new washer, and reassemble. Tightening the packing nut: Sometimes a leak comes from around the stem, not from the spout. Tighten the packing nut (the hexagonal nut) using a wrench. Turn it just enough to stop the leak. Over-tightening makes the tap handle stiff or hard to turn.
Descaling Old Water Kettles and Geysers
Hard water leaves mineral deposits inside kettles and geysers, reducing efficiency and heating time. Descaling restores performance.
Vinegar descaling method: Fill the kettle halfway with white vinegar and halfway with water. Bring to a boil and let simmer for 10 minutes. The acid dissolves mineral deposits. Let cool, empty, and rinse several times with clean water. For geysers, pour the vinegar-water solution into the tank (or use the drain valve to let vinegar sit inside for 1–2 hours), then flush with clean water.
Citric acid descaling: Dissolve two tablespoons of citric acid powder (available for 50–100 rupees at grocery stores) in one litre of water. Use the same heating and soaking method as vinegar. Citric acid is gentler on surfaces and has no vinegar smell. Commercial descaling products: Products like Harpic Bathroom Cleaner or dedicated descaling powders work quickly. Follow instructions on the packet. Usually, you mix with water, let sit for 30 minutes to an hour, then rinse thoroughly. These cost 200–400 rupees but are very effective for stubborn deposits.
Electronics and Gadgets: DIY Home Repair Guide
Cleaning and Speeding Up Old Phones
Old smartphones slow down due to dust, apps, and cached files. Performance improves dramatically with cleaning. According to iFixit’s repair guides, most common phone issues are fixable at home with basic tools. Physical cleaning: dust accumulates in speaker grilles, charging ports, and around buttons. Use a dry soft brush, old toothbrush, or a dry cloth to remove visible dust. For ports, use a toothpick wrapped in cloth (never use water or liquids on electronic components). Clearing dust improves battery life and reduces heat.
Storage cleanup: For instance, go to Settings > Storage and delete old photos, videos, and apps you no longer use. Most phones slow when storage is more than 80% full. Offload photos to cloud storage (Google Photos is free) and delete them from the phone. This alone speeds up an old phone noticeably. App management: Uninstall apps that run in the background and that you have not used in months. Go to Settings > Apps and check which ones are using the most battery and storage. Close or uninstall them. Most old phones have too many apps; removing half of them dramatically improves speed. Clear cache: Go to Settings > Storage > Cached Data (or similar, varies by phone) and clear cached files. Cached data takes up storage and sometimes becomes corrupt, slowing the phone. Clearing it is completely safe.
Fixing Scratched Phone Screens
Small scratches do not affect function but look bad. Various methods minimise visibility depending on scratch depth. Polish method for light scratches: Use a very fine abrasive polish made for screens (search “phone screen polish”). Apply a tiny amount to a microfibre cloth and rub gently in circular motions. This fills micro-scratches without damaging the anti-glare coating. Test on a hidden area first. Toothpaste method: non-abrasive toothpaste (avoid whitening types) can minimise light scratches. Apply a dab to a soft cloth, rub gently, and wipe clean. This works because toothpaste is a very mild abrasive designed for delicate surfaces. Prevention over cure: For future protection, use a screen protector (costs 100–300 rupees) or a glass protective film. these are much cheaper than screen replacement and can be replaced easily when damaged.
Restoring Old Laptop Performance: DIY Home Repair
Slow laptops frustrate users, but most slowdowns are fixable without replacing the machine. Fortunately, there are straightforward solutions. Cleaning internal dust: First of all, dust clogs cooling fans and causes overheating, which makes the processor throttle and slow down. Shut down the laptop, unplug it, and let it cool. If you are comfortable opening it, gently use a compressed air can or hand-held blower to blow dust out of vents and fans. This takes 10 minutes and often restores speed significantly. If you are not comfortable opening it, take it to a service centre (usually costs 300–500 rupees).
Replace the hard drive with an SSD: If your laptop still has a mechanical hard drive, an SSD upgrade is the single biggest performance improvement. a 256GB SSD costs 2000–4000 rupees and is 10 times faster than a traditional hard drive. Installation takes 30 minutes if you do it yourself or 30 minutes at a service centre. This is the most cost-effective upgrade for old laptops.
Remove startup programs: Many programs load automatically when you start your laptop, slowing it down. Go to Settings > Apps > Startup and disable programs you do not need to start automatically. Most people can safely disable 50% of startup programs. Increase RAM: If the laptop has 2GB or 4GB of RAM, upgrading to 8GB or 16GB helps significantly. Check your laptop model to see if RAM is upgradeable (most are). A RAM stick costs 3000–5000 rupees and takes two minutes to install. This is cheaper than buying a new laptop.
Reviving Dead or Dying Batteries
Batteries in phones, laptops, and power banks degrade over time but can sometimes be revived or properly managed. Battery calibration: For lithium-ion batteries (phones, laptops), calibration helps the device accurately measure remaining charge. Fully discharge the device until it shuts off. Charge it to 100% without interruption, then use normally. Doing this quarterly helps the battery last longer.
Stop heat damage: Batteries degrade fastest in heat. Keep devices out of direct sunlight and avoid using them while plugged in and charging simultaneously. Remove the laptop from its case occasionally if it feels hot. Heat kills batteries much faster than age. Replace removable batteries: Older phones and devices had replaceable batteries. If your device has one, buying a new battery costs 500–2000 rupees depending on the device — much less than replacing the entire device. Many local shops sell replacement batteries. For non-replaceable batteries: If your phone or laptop battery is failing and cannot be replaced easily, authorised service centres can replace internal batteries for 2000–5000 rupees depending on the device, which is still cheaper than a new device.
Cost of Repair vs Buying New: A Financial Comparison
The decision to repair or replace depends partly on cost. This DIY home repair restoration cost guide gives you a realistic comparison for 15 common household items in 2026:
| Item | Average Repair Cost | Average Replacement Cost | Verdict |
|---|---|---|---|
| Wooden chair (wobbly) | 100–200 | 2000–8000 | Repair |
| Kitchen tap (leaky) | 50–150 | 1500–3000 | Repair |
| Mixer grinder (slow) | 200–500 | 3000–8000 | Repair |
| Water kettle (not heating) | 100–300 | 800–2000 | Repair |
| Smartphone (cracked screen) | 2000–5000 | 15000–50000 | Repair |
| Laptop (slow) | 1000–3000 (SSD upgrade) | 30000–80000 | Repair |
| Wooden almirah (sticky doors) | 100–300 | 8000–20000 | Repair |
| Cotton shirt (torn seam) | 50–150 | 500–2000 | Repair |
| Table (scratched top) | 150–400 | 3000–10000 | Repair |
| Geyser (not heating properly) | 300–800 | 5000–15000 | Repair |
| Washing machine (leaking) | 800–2000 | 20000–50000 | Repair |
| Fan (not rotating) | 100–300 | 1500–4000 | Repair |
| Refrigerator (not cooling) | 1500–4000 | 25000–60000 | Repair |
| Jeans (torn knee) | 100–300 | 1000–3000 | Repair |
| Wooden cupboard (hinge broken) | 200–400 | 5000–15000 | Repair |
Key takeaway: Repair is almost always cheaper. Even complex appliance repairs cost one-third to one-half the price of replacement. For furniture, clothes, and electronics, repairs save 90% or more compared to buying new.
Essential Tools Every Indian Home Should Have: Toolkit Checklist
You do not need hundreds of tools to handle most DIY home repair restoration projects. A small starter toolkit with a dozen essentials covers 95% of common tasks. Here is what to buy:
Basic Toolkit (Budget: 1500–2500 rupees)
- Hammer (500g, wooden handle): 150–250 rupees.
- Screwdriver set (flathead and Phillips): 150–300 rupees.
- Adjustable wrench (8-inch): 100–200 rupees.
- Pliers (slip-joint or locking): 100–150 rupees.
- Tape measure (5 metres): 80–120 rupees.
- Spirit level (2 feet): 150–250 rupees.
- Utility knife: 50–100 rupees.
- Hammer drill bits or hand drill: 200–400 rupees.
- Sandpaper assortment (80, 120, 220 grit): 100–150 rupees.
- Hand saw or coping saw: 200–400 rupees.
- Clamps (C-clamp or bar clamp): 150–300 rupees.
- Toolbox to store everything: 200–400 rupees.
Additional Supplies to Keep on Hand
- Wood filler and wood glue: 150–250 rupees.
- Enamel paint and brushes: 300–500 rupees.
- Screws, nails, and washers assortment: 150–300 rupees.
- Teflon tape and silicone sealant: 100–200 rupees.
- Cloth rags and newspaper: Free.
- Masking tape: 30–50 rupees.
- Safety gloves and dust mask: 50–100 rupees.
In total, this complete home toolkit costs 3000–4500 rupees. this pays for itself with the first major repair, and typically you will spend this amount within a year as you handle various projects around the home.
Frequently Asked Questions
When should I repair something instead of replacing it?
In general, repair is almost always the better choice financially, particularly if the repair cost is less than 50% of replacement cost. For items you use daily (furniture, appliances, clothes), repair makes sense even if the cost is 70% of replacement, because the repaired item still has significant life left. Only consider replacement if the item requires multiple expensive repairs within one year, or if repair is impossible due to age or damage severity.
Is DIY repair safe or should I always hire a professional?
Simple DIY home repair restoration tasks like fixing scratched furniture, patching clothes, and clearing mineral deposits are completely safe and require only basic skills. Avoid DIY work on electrical circuits, gas appliances, plumbing under pressure, and structural repairs without proper knowledge. For everything else, the techniques in this guide are safe and proven. Always unplug electrical devices before working on them, and if you feel unsafe at any point, hire a professional.
What is visible mending and why is it becoming popular in India?
Visible mending means celebrating repairs by making them obvious rather than hiding them. A colourful patch on jeans or a contrasting thread repair on a shirt becomes a design feature. It is becoming popular because it is sustainable, reduces waste, honours traditional craftsmanship, and makes clothing more individual. Many Indian designers now create clothes with intentional visible mending as a style choice.
How can I prevent common repairs from being needed in the first place?
Prevention is much cheaper than repair. The best DIY home repair restoration approach starts with regular maintenance. Furniture benefits from coasters and placemats that prevent stains and scratches. For clothes, mend small tears immediately rather than waiting until they become large. Appliances need monthly filter cleaning, quarterly descaling of kettles and geysers, and protection from extreme heat. Finally, electronics last longer when kept in protective cases and handled carefully to avoid drops. Regular maintenance (a few minutes monthly) prevents 80% of future repairs.
Can I repair everything myself or are some repairs too complicated?
Most DIY home repair restoration projects are easier than you think. furniture, clothes, and minor appliance repairs are perfect for beginners. Electrical repairs, gas appliance work, and anything involving high pressure requires professional help. When in doubt, first research the specific repair online, watch a video, or ask experienced friends. If you feel unsafe or unsure after researching, hire a professional. It is better to spend 500 rupees on professional work than to damage a 5000 rupee item.
Where do I buy repair materials and tools in India?
Local hardware stores carry most tools and materials. large cities have shops dedicated to wood finishes, fabrics, appliance parts, and electronics. Online options include Amazon, Flipkart, and local marketplace apps. For specialised materials (wood fillers, dyes, parts), specify your requirement and a shop owner will usually help you find the exact product. Always ask for prices at multiple shops before buying, as prices vary significantly.
Conclusion: Embrace DIY Home Repair Restoration
the repair and restoration culture is not just about saving money, although that matters. It is about sustainability, self-reliance, and respecting the craftsmanship that goes into making quality items. Your grandmother’s wooden almirah, your favourite old shirt, and that mixer grinder that has served your family for a decade deserve care and restoration rather than disposal.
this DIY home repair restoration guide provides practical, tested techniques for repairing almost everything in your home. Start with small projects like fixing scratched furniture or patching clothes to build confidence. Once you complete repairs successfully, you will feel more comfortable tackling larger projects.
The best part is financial freedom. In other words, learning to repair means spending less on replacements and having more money for things that matter. In 2026, the families saving the most money are the ones that fix things first and ask questions later. For more home improvement tips, maintenance guides, and lifestyle advice for Navi Mumbai residents, visit NaviMumbai.com regularly. You can also find high-quality repair tools and materials on Amazon India. We share practical guides for Indian homes and neighbourhoods. Published by NaviMumbai.com | Updated March 19, 2026 Disclaimer: This guide provides general DIY advice. Always prioritise safety. For complex repairs involving electrical, gas, or structural components, consult a qualified professional. NaviMumbai.com is not responsible for damage or injury from DIY attempts.
Also read: 25 out-of-waste home decor ideas and our guide to minimalist living in India.
Written by NaviMumbai Editorial
NaviMumbai.com is a local city guide covering real estate, lifestyle, education, and travel across Navi Mumbai. Our editorial team researches and publishes practical, up-to-date guides for residents, homebuyers, and visitors exploring the planned city.


